The trees in my neighbourhood
Module 4 - Each tree has its own soil requirements
Download the module 4 [PDF 786 KB]
Summary of module 4
Students become familiar with the types of soil texture and relate them to the tree's needs. In the first activity, they perform a tactile test to identify soil texture. In the second activity, they use measurements to verify their observations. Finally, they link each soil texture to the tree species that can adapt to it. They recommend a species to be planted, as a function of the texture of the soil near the school (in Module 5 - optional).
Cross-curricular competency
- CCC1 - Use information
Subject area competencies
- SAC1 - Seek answers or solutions to scientific or technological problems: define a problem, choose an investigation or design scenario, carry out the procedure, conduct an experiment, analyze the results or solution
- SAC2 â Make the most of knowledge of science and technology: understand how technical objects work, understand natural phenomena
- SAC3 - Communicate in the languages used in science and technology: participate in exchanging scientific and technological information, divulge scientific or technological knowledge or results, interpret and produce scientific and technological messages
Objectives
- Understand the relationship between the characteristics of soil and the needs of the tree
- Become familiar with the types of soil texture
Contents
- Diversity of life: habitat, physical and behavioral adaptation
- Life-sustaining processes: photosynthesis and respiration
- General characteristics of the Earth: water
- Geological and geophysical phenomena: water cycle
Classroom organization
- As a group and in teams of 4 to 6 students
- Duration: two class sessions, of 45 and 60 minutes
Soil requirements
- One 2 kg (approx.) bag of sand, for ex. cement sand
 - One 2 kg (approx.) bag of clay
 - One batch of soil (approx. 3.5 kg) from the location intended for tree planting
 - Soil samples of 500 g brought in by students who wish to analyze the soil texture of their yard or neighborhood
Sequence of activities for Module 4
- Activity 1: Getting your hands dirty - 45 minutes in class â as a group and in teams of 4 to 6 students
Students learn to make a qualitative distinction between different soil textures, by two tactile tests (handful test, ribbon test). One of the soil samples to be tested is from the location intended for tree planting. The other samples are brought by students (optional). Students fill out the Experiment 1 worksheet. They become initiated to the research protocol to follow for Activity 2.
 - Activity 2: I choose a tree â 60 minutes in class â as a group and in teams of 4 to 6 students
Students learn to make a quantitative distinction between different soil textures. After measuring layers of sand, clay and silt by decantation, they time how long it takes each type of soil to drain. They use their conclusions and a chart to identify the tree species adapted to their soil. Finally, they decide together which tree species to plant in the location they have chosen (optional).
Â
Activity 1 - Getting your hands dirty
Teacher Activity 1
Summary
Students learn to make a qualitative distinction between different soil textures, by two tactile tests (handful test, ribbon test). One of the soil samples to be tested is from the location intended for tree planting. The other samples are brought by students (optional).
Students fill out the Experiment 1 worksheet. They become initiated to the research protocol to follow for Activity 2.
Classroom organization
45 minutes in class â as a group and in teams of 4 to 6 students
Preparation â 30 minutes
You will need 3 batches of soil of different textures (A, B and C) for these 2 activities.
- First define the number of teams, in order to prepare the correct number of soil samples.
-
Each team requires 2 samples from each batch, each approximately 250 g (1 cup).
To constitute the 3 types of soil:
1. Take one 2 kg (approx.) bag each of clay and sand.
2. Collect a batch of soil of 3.5 kg (approx.) from the location intended for tree planting (from a depth of approximately 30 cm).
3. Batch A (texture to be identified): this is the soil from the location intended for tree planting.
4. Batch B (sandy soil): prepare a mixture according to these proportions: approximately 2/3 sand and 1/3 soil from batch A.
5. Batch C (clay soil): prepare a mixture according to these proportions: approximately ½ clay and ½ soil from batch A.
6. Batch D (optional â texture to be identified): for each team, prepare a soil sample of 500 g (taken from a depth of approximately 30 cm) from soil in students' yards or neighborhood.
N.B. You may have to sift batches A and D to remove rocks, stones or gravel.
Material required for each team
Four 500 ml bowls or beakers
One 250 g (1 cup) sample of each type of soil (A,B,C)
Sample D (optional)
| Worksheet title | Contents | Quantity/User |
|---|---|---|
| Concepts | Soil texture | 1 teacher |
| Answer key 1 | Answers to Experiment 1 worksheet | 1 teacher |
| Experiment 1 | Protocol for the qualitative test | 1 per student |
| Experiment 2 | Protocol for the quantitative test | 1 per student |
Step-by-step procedures
- Remind students that the tree has a relationship with its environment, and review the concepts covered in previous modules if they were presented to the class. Explain that the soil constitutes an important component of the tree's environment and that its type determines the species that can be planted in it. Review concepts related to soil and texture (Concept worksheet).
 - Distribute the Experiment 1 worksheet and explain the tactile test protocol.
 - Present the tree types of soil and explain how to recognize them. Explain the procedure for the two tests (handful of soil and ribbon), using the image below.
  - Principle of the handful of earth test: determine whether a handful of earth can be compressed easily without breaking it into clumps, and whether finger marks remain imprinted in the soil.
  - Principle of the soil ribbon test: determine whether one can make a ribbon and whether it will break or crack easily.
 - Allow the students to experiment in teams, and fill out the Experiment 1 worksheet.
 - Start a discussion about the results (as a group), and make corrections as necessary.
 - Distribute the Experiment 2 worksheet and complete steps 1, 2 and 3 of the experiment protocol in preparation for Activity 2 (allow a minimum of 24 h for soil to settle). Summarize the concepts covered during the activity.
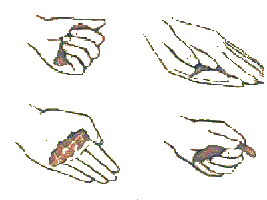
Determination of soil texture: handful of soil test (left) and ribbon test (right)

Activity 2 - I choose a tree
Teacher Activity
Summary
Students learn to make a quantitative distinction between different soil textures. After measuring layers of sand, clay and silt by decantation, they time how long it takes each type of soil to drain. They use their conclusions and a chart to identify the tree species adapted to their soil.
Finally, they decide together which tree species to plant in the location they have chosen (optional).
Classroom organization
60 minutes in class â as a group and in teams of 4 to 6 students
Material required for each team (first test)
One 250 g sample of each type of soil (A, B, C)
Sample(s) D (optional)
Four 500 ml (approx.) jars (including cover)
A teaspoon
Table salt
1 ruler
1 stopwatch (or a watch with a second hand)
| Worksheet title | Contents | Quantity/User |
|---|---|---|
| Concepts | Soil texture | 1 teacher |
| Answer key 2 | Answers to Experiment 2 worksheet | 1 teacher |
| Experiment 2 | Protocol for the quantitative test | 1 per student |
Step-by-step procedures
- Review soil texture concepts and summarize what was accomplished in Activity 1.
 - Conduct the experiment. Fill out the rest of Experiment 2 worksheet while conducting the experiment.
 - Compile the results.
 - Discuss which tree species could be planted as a function of the soil in sample D.
Teacher Concepts
Soil texture
The soil is fundamental for tree growth. Trees extract water and mineral salts from the earth to meet their nutritional requirements. The soil also anchors their roots, and constitutes the environment in which its seeds germinate. In order to plant the right tree in the right location, a few pedological concepts (pedology is the science of soil) are very useful!
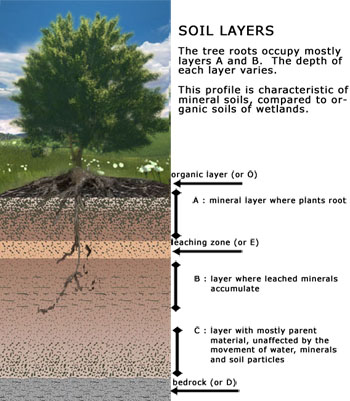
The soil is composed of several layers (or horizons).
Plants primarily take root in horizon A.
Superficial organic debris (humus or organic layer) makes up horizon O.
Horizon B contains more mineral matter but is less accessible to plants.
Horizon C contains debris from the parent rock, which itself composes horizon D.
See also the animation
on
nutrient absorption
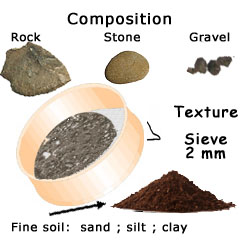
One of the key characteristics of soil, one that determines which tree species will grow in it, is texture. Texture is the proportion of each of three large particles of which soil is composed: sand, silt and clay. Grains of sand are the largest particles, and clay constitutes the smallest.
Silt grains are of an intermediary size.
Soil also contains larger particles (gravel, rock), but they are not considered when determining texture.
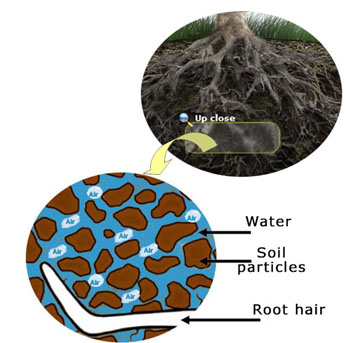
The interstices between particles are filled by air and water. Soil texture should not be confused with its structure. The latter depends on the size of the different particles that make up the soil.
 Particles of sand make soil texture more granular and therefore crumbly. Smaller particles like clay give soil a sticky texture. This is what makes it possible to roll the soil into a ribbon.
On the one hand, texture influences the capacity of roots to develop and extend into the soil. On the other hand, it has a direct impact on drainage, the capacity of soil to allow water to flow through. This characteristic is very important for the plant, because if soil does not evacuate water quickly enough, the roots are asphyxiated. If water drains too quickly, the tree doesn't have time to extract the mineral salts it requires. The nutritional elements then leach down deeper into the soil. A sticky soil composed primarily of clay is asphyxiating. A more granular soil like sand is well-aerated but dries out and heats up more quickly.
As a function of texture, there are three major types of soil:
  - Sandy soil: 70% sand or more. Poor soil, aerated, dry (rapid drainage) and crumbly.
  - Loamy soil: approximately 40% sand, 40% silt and 20% clay. Fertile soil, crumbly (chunky), aerated and humid.
  - Clay soil: 25% clay or more. Fertile soil, sticky but asphyxiating (slow drainage).
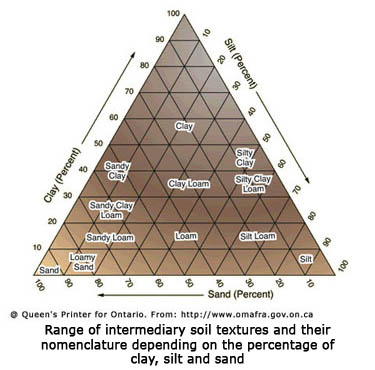
In between these three major categories, there are a whole range
of intermediary textures that can be identified using the Range of intermediary soil textures diagram.
Student -Experiment 1
Introduction
The soil is fundamental for tree growth. Trees extract water and mineral salts from the earth to meet their nutritional requirements. The soil also anchors their roots, and constitutes the environment in which its seeds germinate. Soil type can be approximated through qualitative tests. Particles of sand make soil texture more granular and therefore crumbly. Smaller particles like clay give soil a sticky texture.
Experimental protocol
Material
- Four 500 ml bowls or beakers
- One 250 g sample of each type of soil (A, B, C)
- A 250 g sample of soil D (optional)
1. Identify the bowls with the letters A, B, C (D optional).
2. Take a 250 g sample of each soil type and place one sample in each bowl.
3. Manipulate the soil samples between your fingers and note your observations in the chart below:
| Â | Presence of grains | Malleability | Presence of clumps |
|---|---|---|---|
| Sample A | Sample B (sandy) |
Sample C (clayey) |
Sample D (optional) |
| Â | Â | Â | Â |
4. Add 50 ml water to each bowl.
5. Manipulate the moistened soil samples with your fingers.
| Â | Presence of grains | Malleability (ribbon and handful) tests) |
Presence of clumps |
|---|---|---|---|
| Sample A | Sample B | Sample C | Sample D (optional) |
| Â | Â | Â | Â |
6. Compare your observations with the data in the chart below, and identify the texture type of the soil samples:
| Soil texture | Dry soil | Moist soil |
|---|---|---|
| Sandy soils | - Grains of sand are visible to the naked eye. - Soil runs between the fingers like sugar. - Soil is very granular and abrasive. |
- Soil is very difficult to shape, breaks when touched. - Soil doesn't stick to the fingers; rough and abrasive to the touch. |
| Clayey soils | - Soil is composed of very hard clumps, and difficult to break. | - Soil is very sticky; it is smooth and shiny. - Soil is very easy to shape; it can be shaped into long, flexible ribbons by rolling it between the hands. |
| Loamy soils | - Soil is a little granular. - Soil can be manipulated with care, without breaking up the clumps. |
- Soil sticks a little and is a little granular. - Soil can be rolled into a ribbon between the hands; ribbon cracks a little. |
Texture of Sample A: __________________
Texture of Sample B: __________________
Texture of Sample C: __________________
7. Perform the tests to identify soil texture of Sample D, if appropriate. Then pour 50 ml water into the bowl and perform the tests to identify moist soil.
Description of the texture of sample D when dry: __________________
Description of the texture of sample D when moist: __________________
Texture of sample D: __________________
Student - Experiment 2
Introduction
Texture is one of the key characteristics of soil, one that determines which tree species will grow in it.
Texture is the proportion of each of three large particles of which soil is composed: sand, silt and clay. Grains of sand are the largest particles, and clay constitutes the smallest. Texture has a direct impact on drainage, that is, the capacity of soil to retain water.
Quantitative tests are used to determine soil texture with precision.
Material required for each
Experiment 1
- Four 500 ml jars (including covers)
- A teaspoon
- Table salt
- 1 ruler
- One 250 g sample of each type of soil (A, B, C, D â optional) from Activity 1
Experiment 2
- 4 plastic pots for indoor plants, approx. 8-9 cm (3.5 inches) in diameter, with drainage holes
- A new batch of 250 g samples of each type of soil (A, B, C, D â optional)
- 1 stopwatch (or a watch with a second hand)
Protocol for Experiment 1: Measuring layers of soil
1. Identify the jars with the letters A, B, C, and D (optional).
2. Take the 250 g soil samples of each type of soil (A, B, C, and D â optional) from Activity 1 and place each sample in the appropriate jar.
3. Add water almost to the top of the jar. Add two teaspoons of salt to each jar.
4. Close the cover of each jar and shake it vigorously.
5. Allow the jars to stand for a minimum of 24 hours so that the earth settles at the bottom.
6. Then use a ruler to measure the thickness of each of the different soil layers visible as well as the total thickness of the soil.
7. Use the diagram below to fill out the results chart.

- Source: Fertilization - Horticultural Leaflet, Green Pages of the Montréal Botanical Garden.
Â
| Â | Sand thickness | Silt thickness | Clay thickness | Total thickness |
|---|---|---|---|---|
| Sample A | Â | Â | Â | Â |
| Sample B | Â | Â | Â | Â |
| Sample C | Â | Â | Â | Â |
| Sample D | Â | Â | Â | Â |
8. Based on the thickness of each layer, calculate the percentage of each element.
    % sand:
(sand layer thickness X 100) ÷ total thickness of soil in jar
    % silt:
(silt layer thickness X 100) ÷ total thickness of soil in jar
    % clay:
(clay layer thickness X 100) ÷ total thickness of soil in jar
| Â | % sand | % silt | % clay |
|---|---|---|---|
| Sample A | Â | Â | Â |
| Sample B | Â | Â | Â |
| Sample C | Â | Â | Â |
| Sample D | Â | Â | Â |
9. Then determine the soil type for each batch, using the chart below:
| Soil texture | % sand | % silt | |
|---|---|---|---|
| Sandy soil | 70 and higher | 0 to 30 | 0 to 15 |
| Silty soil | 0 to 20 | 80 and higher | 0 to 15 |
| Clayey soil | 0 to 45 | 0 to 40 | 25 and higher |
| Loamy soil | 40 to 60 | 30 to 50 | 15 to 25 |
Â
| Â | Type (soil texture) |
|---|---|
| Sample A | Â |
| Sample B | Â |
| Sample C | Â |
| Sample D | Â |
10. Compare your results with those from Activity 1. Which method do you think is more reliable? Why?
Protocol for Experiment 2: Calculating drainage time
1. Place a 250 g sample of each of the four soil batches into the planting pots, taking care to label each pot accordingly (A, B, C and D â optional).
2. Moisten each sample with approximately 15 ml water. Let stand 2 minutes.
3. Quickly pour 50 ml water onto each sample, and time how long it takes for the liquid to drain out of each soil, that is, the time until the first drop of water flows out of the drainage holes. Note the results in the chart below:
| Â | Drainage time |
|---|---|
| Sample A | Â |
| Sample B | Â |
| Sample C | Â |
| Sample D | Â |
4. Using the chart below, describe the drainage of each of the four soils:
| Â | Soils (A, B, C, D) |
|---|---|
| Good drainage: rainwater and melting snow is absorbed rapidly. |
 |
| Moderate drainage: water drains easily but slowly, and sometimes accumulates for short periods. |
 |
| Imperfect drainage: water from precipitation or ground water sometimes accumulates for long periods. |
 |
| Poor drainage: water is constantly present, drains with difficulty and keeps soil humid year round. |
 |
5. Using the data below and the results from your experiments, identify which tree species would be most appropriate for planting in Sample A (and D â optional).
| Â | Good to moderate drainage | Imperfect to poor drainage |
|---|---|---|
| Sandy soil | White pine, red pine, red oak, northern whitecedar | White pine, larch, black spruce, willow, red ash |
| Loamy soil | White pine, red pine, white spruce, black spruce, northern whitecedar, sugar maple, red maple, white ash, red ash, red oak, black cherry, beech, linden, black walnut, butternut, shagbark hickory, bur oak | Northern whitecedar, larch, black spruce, silver maple, red maple, willow, green ash |
| Clayey soil | White pine, white ash, red ash, northern whitecedar, beech, black walnut, butternut, bur oak | Larch, black spruce, silver maple, red ash, willow |
Source : Choosing the right tree
